Online & Mobile Banking
Receive access to helpful money management tools.
Our financial tech can save you a lot of time
Your daily schedule is packed. You're always looking for faster ways to get things done. At Abound Credit Union, we've got your back with Online and Mobile Banking tools.
Manage money at home or on-the-go
Access your accounts morning, noon and night - and on weekends and holidays as well.
Make bill and loan payments electronically, without needing envelopes or postage.
Use your smartphone camera to deposit checks with our mobile app.
Receive email or text alerts that notify you about important account activity.
Your hard-earned funds are right at your fingertips
Log onto your laptop. Or fire up your smartphone. Wherever life takes you today, your Abound accounts are only a few seconds away with Online & Mobile Banking. Check balances, transfer funds, review transactions - and do it all safely with our state-of-the-art security measures.
- A free service of Abound Credit Union*
- Tap into your accounts anytime from almost anywhere
- Get up-to-date account balances
- Transfer funds between Abound accounts or to Abound from other financial institutions
- View account history
- Make on-time bill and loan payments
- Timely account history, plus you can opt-in for e-Statements (electronic statements)
- Download the free Abound app from Google Play or the App Store
- Easy and secure access with Touch ID, Face ID or 4-digit login passcodes
- Check balances and transfer funds
- Make easy bill and loan payments
- Deposit checks with your mobile device camera
- Link your Debit or Credit Card to your mobile device for one-tap Digital Wallet payments¹
- Use card controls to lock and unlock your Credit Cards and put limits on card use
A Better Digital Banking Experience
Easy and secure access with Touch ID, Face ID or 4-digit login passcodes
Deposit your checks anywhere without having to leave home
Connect other external bank accounts to transfer $ to and from accounts
New look and feel makes it easier than ever to pay bills and access any existing payees and payment schedules
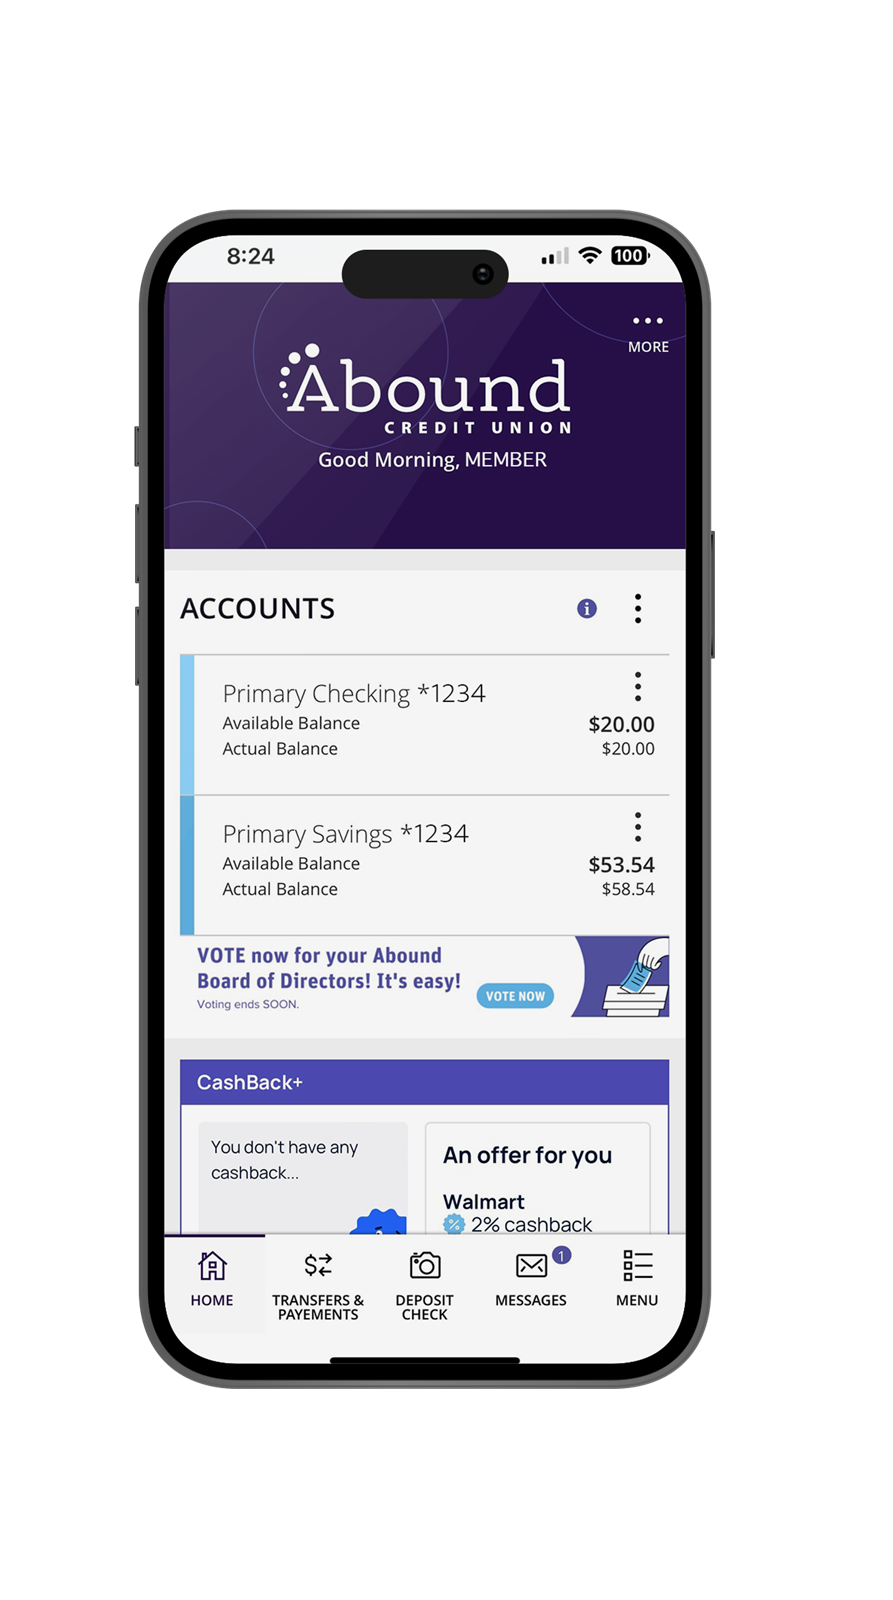
Set up recurring and one-time payments for your Abound loans on any device
How-To's and Step by Steps:
Our how-to tools & tips help you get things done
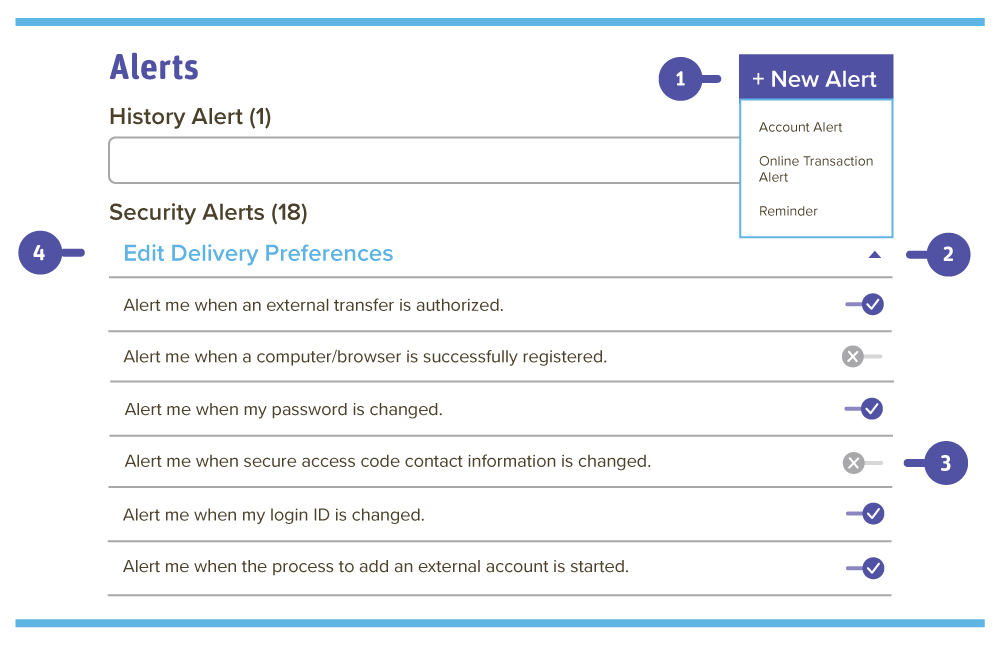
Find Alerts under the Settings & Alerts tab
- The New Alert button lets you create an account, online transaction alerts and reminders
- The ^ icon allows you to collapse or expand alert options for each category
- Toggling the "Enabled" switch turns an alert on or off without deleting it
- The "Edit" link lets you make edits to existing alert preferences
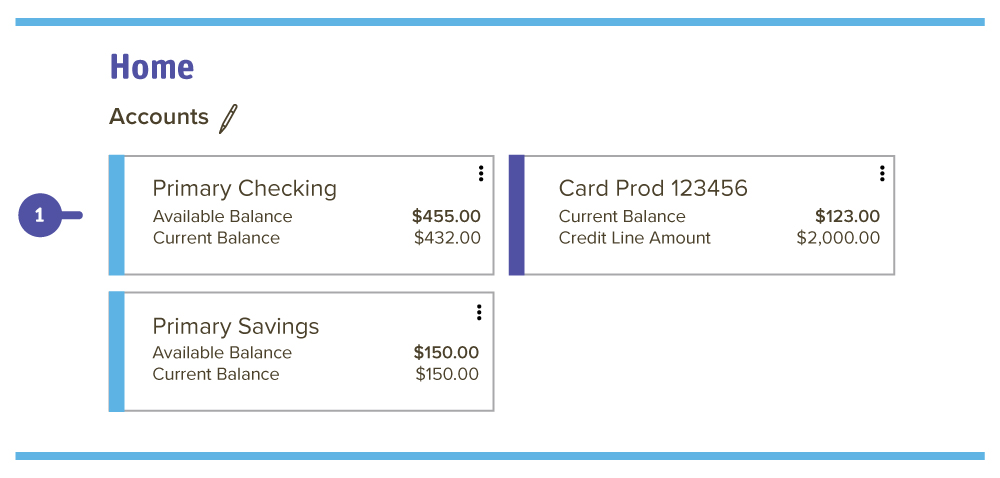
- On the Home page, you can click on an account name to view the Account Details screen. You can also click the right side of an account card and click the View Activity Button
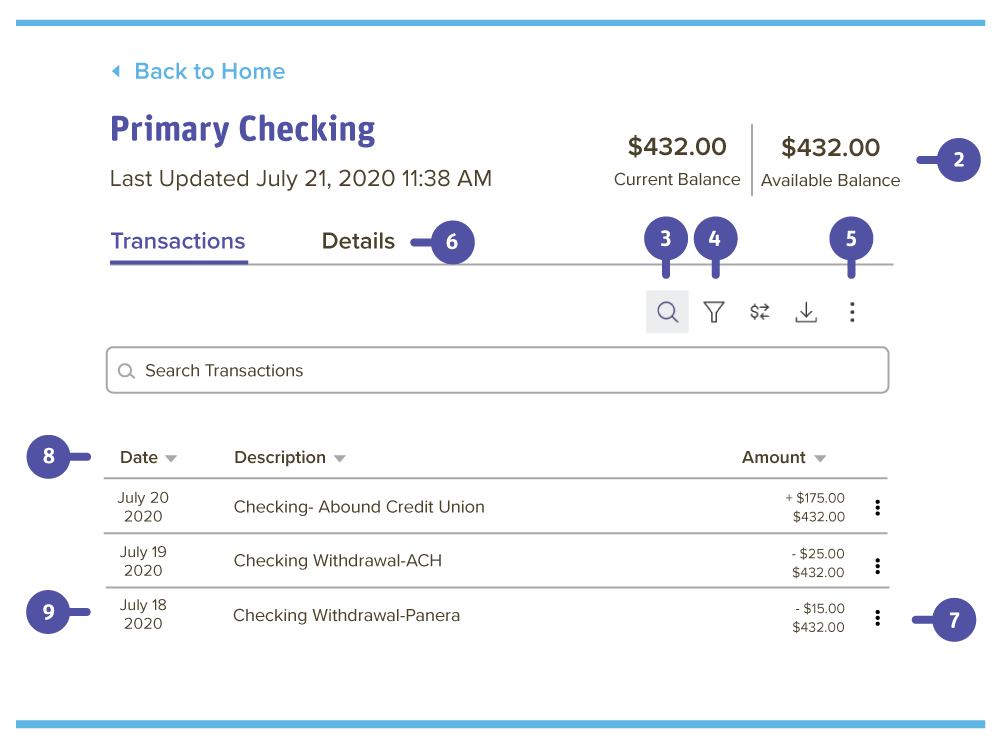
- The available balance of that account is displayed in the top right corner
- You can find transactions within the account using the search bar
- Transactions can be sorted by time, type, amount or check number. Click the Filters icon for more options
- The 3 vertical dots icon lets you send a secure message about that account or print a list of transactions. You can also export your transactions into a different format by clicking the download icon
- More information about your account is available by clicking the Details tab
- After clicking a transaction, the three vertical dots icon lets you send a secure message about that transaction or print the transaction
- The arrow next to Date, Discription and Amount sorts them
- You can view more details about a transaction by clicking on it
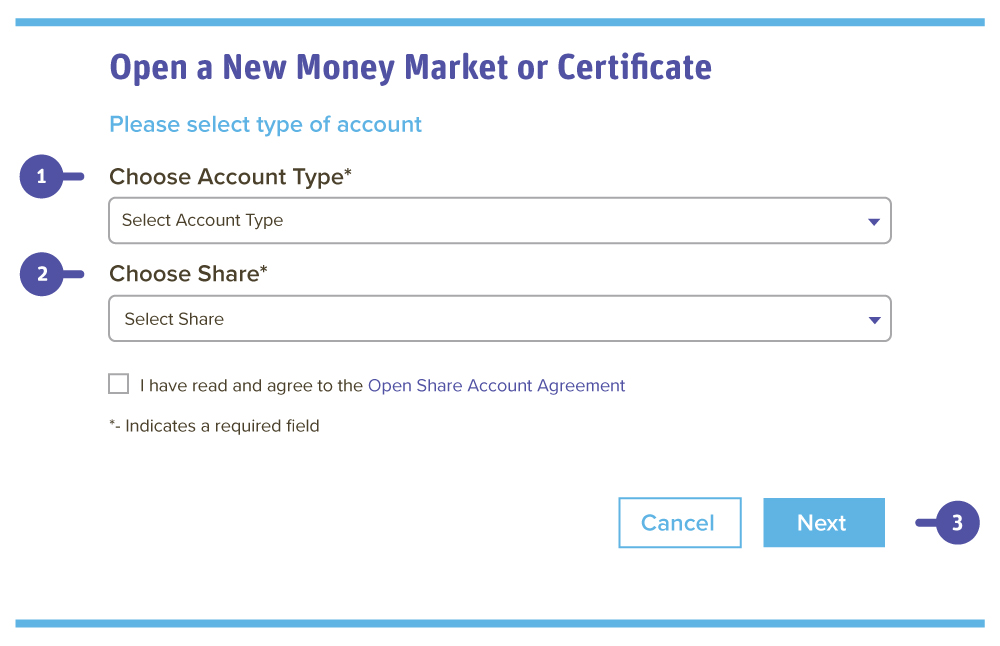
In the Apply & Open tab, click Money Market or CD
- Use the drop-down to select an Account Type
- Use the drop-down to select a Share Type
- Click Next
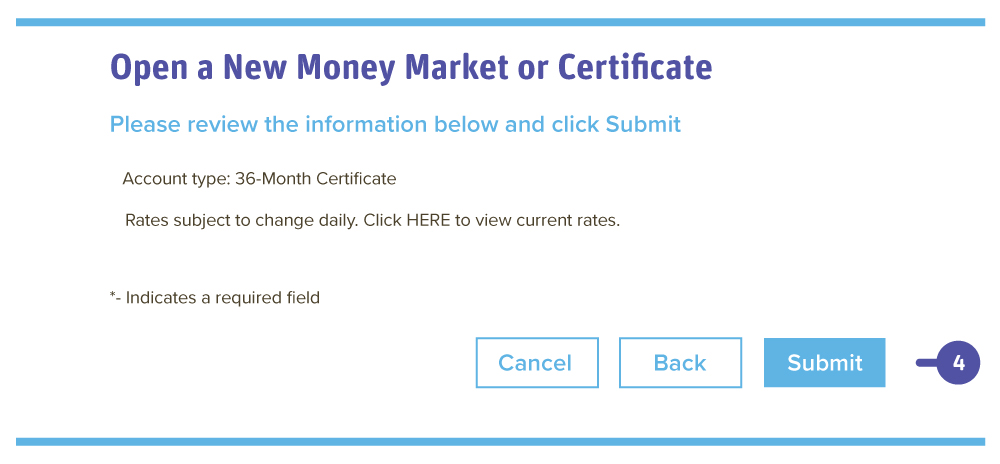
- Verify the information and click the Submit button when you are finished
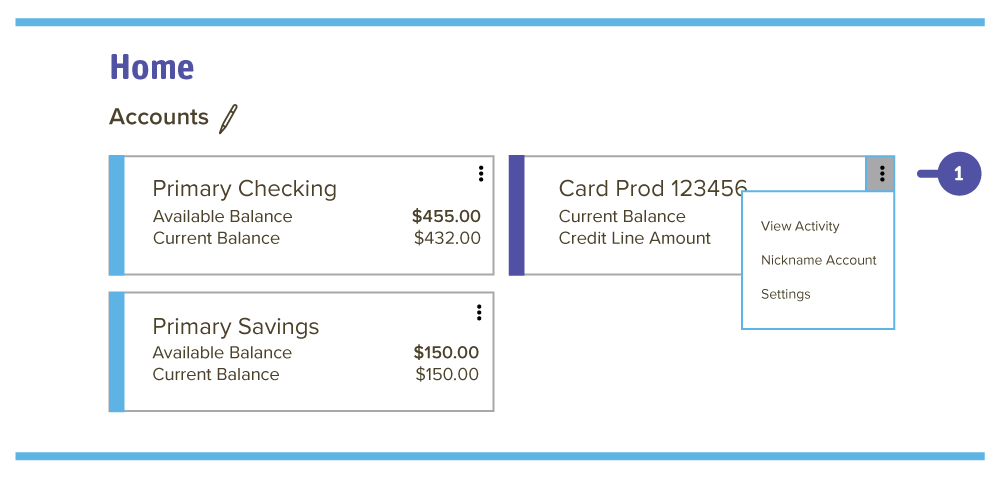
- Click the 3 vertical dots icon on the right side of an account card and select Nickname Account
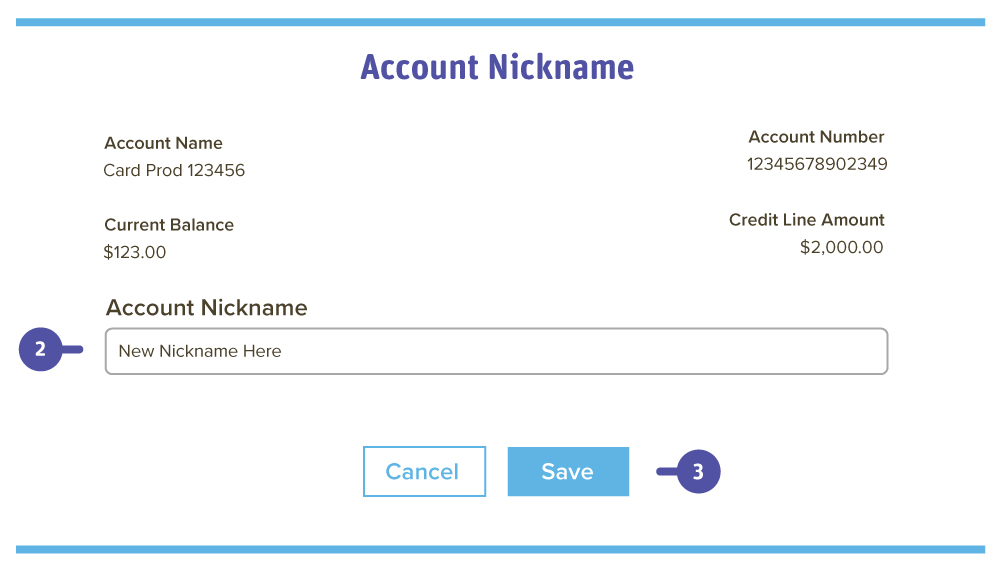
- Enter an account nickname
- Click the save button when you are finished
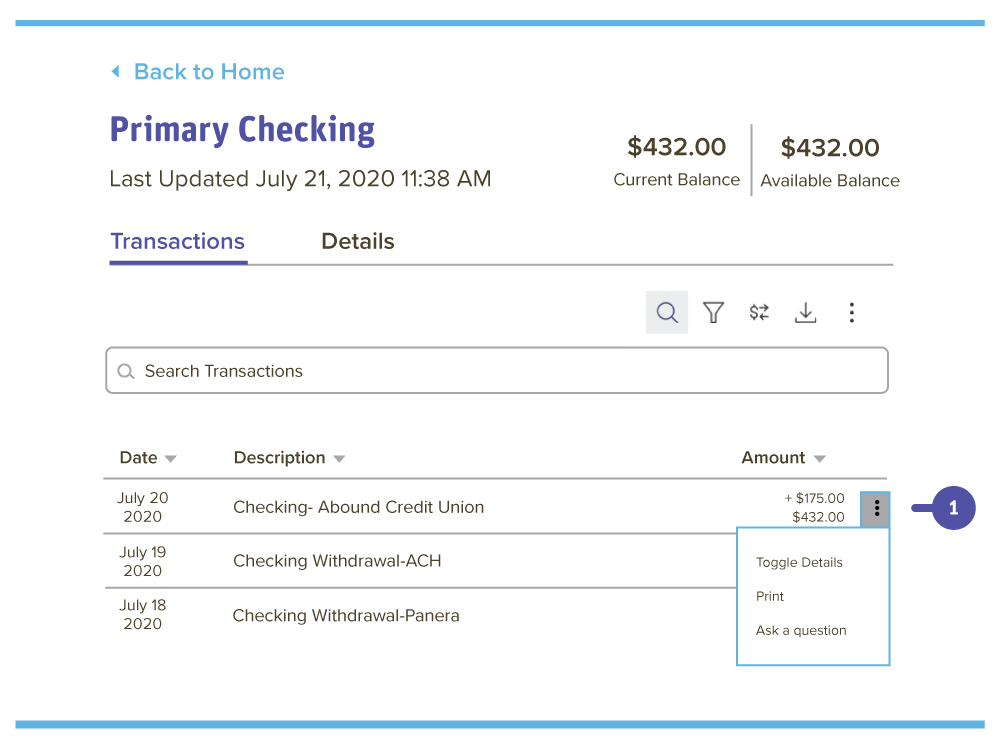
- Click on the three vertical dots icon next to an individual transaction
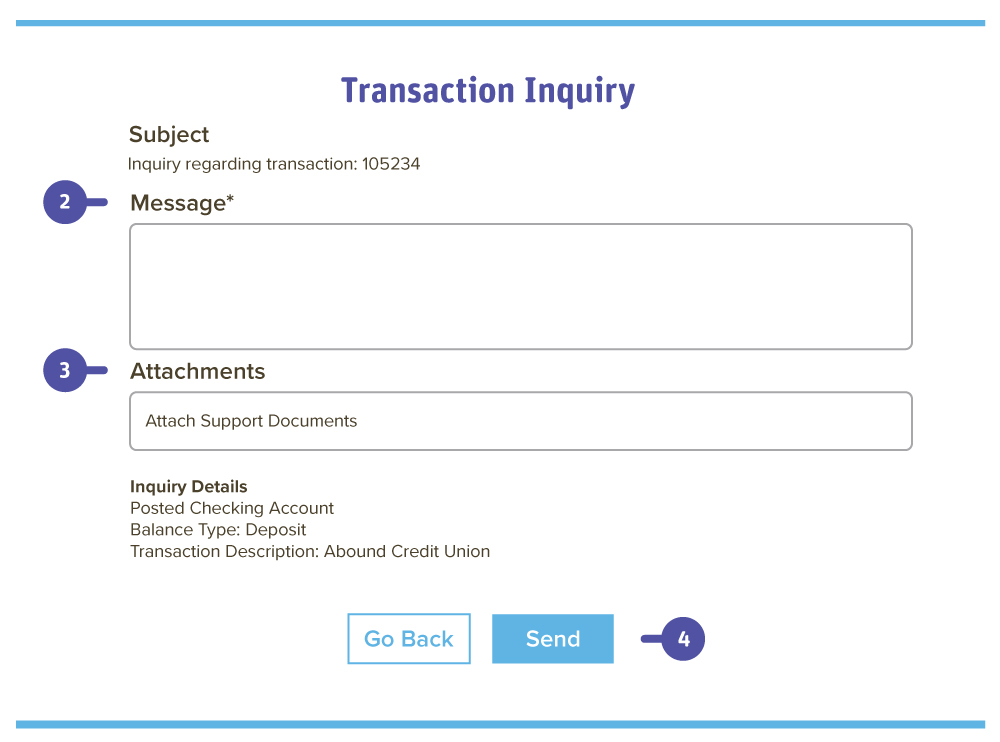
- Type in your message
- (Optional) Attach a document
- Press send
For Credit Cards:
Click the Card Management tab
- You can easily disable or enable your card with a simple click on the toggle
- When you click the Card Image, it leads you to the details of your card
- Once clicking the Card Details button, the top section shows details of your card
- You have the ability to Set Travel Notifications
- Click on card image, and scroll to the Travel Notifications tab under Communication. Here you can choose which card to set a travel notice on
- Set your departure date and return date (departure date must be at least two days in advance to process). If not two days notice, please follow debit card messaging instruction, but select Credit Card Questions on the message recipient drop down
- Choose where you will be traveling: International or Domestic and enter destination.
- Add a contact number
- Click Submit
Debit Card Set Travel Notifications and Questions:
- Send us a Secure Message though Online/Mobile Banking
- Click Messages
- Click - create a message
- Select Debit Card Questions on the Message recipient drop down
- Message subject - Travel Notification
- Please provide your - departure date, return date and where you will be traveling in the Message
For Credit Cards:
Click the Card Management tab
- To active your card - click on card controls, click on the card image, enter your information and click activate
- You can easily disable or enable your card with a simple click on the toggle
- When you click the Card Image, it leads you to the details of your card
- Once clicking the Card Details button, the top section shows details of your card
- Here, you can order a replacement card
- You can also report a lost or stolen card
- You can select card controls and alerts
- You also have the ability to Set Travel Notifications
- Click on card image, and scroll to the Travel Notifications tab under Communication. Here you can choose which card to set a travel notice on
- Set your departure date and return date (departure date must be at least two days in advance to process). If not two days notice, please follow debit card messaging instruction, but select Credit Card Questions on the message recipient drop down
- Choose where you will be traveling: International or Domestic and enter destination.
- Add a contact number
- Click Submit
Debit Card Travel Notifications and Questions:
Set Travel Notification
- Send us a Secure Message though Online/Mobile Banking
- Click Messages
- Click - create a message
- Select Debit Card Questions on the Message recipient drop down
- Message subject - Travel Notification
- Please provide your - departure date, return date and where you will be traveling in the Message
- On your mobile device, click "Deposit A Check"
- Choose which Account you want to deposit your check into
- You can choose between your Checking and Savings accounts
- The "Amount" should match the Check Amount
- Tap the "Front of Check" button to take a photo of the front of your check
- Follow the on screen instructions for taking a photo of the front of your check
- Tap the "Back of Check" button to take a photo of the back of your check
- Follow the on screen instructions for taking a photo of the back of your check
- Press Done
Helpful Tips!
- Be sure to write For Mobile Deposit on the back of your check below your signature before taking the photo.
- If you make a deposit prior to 3:00 pm on a business day, you'll have the money in your account by 4:00 pm on the same day once your deposit is approved. Any deposits made after 3:00 pm will appear in your account by 4:00 pm on the following business day.

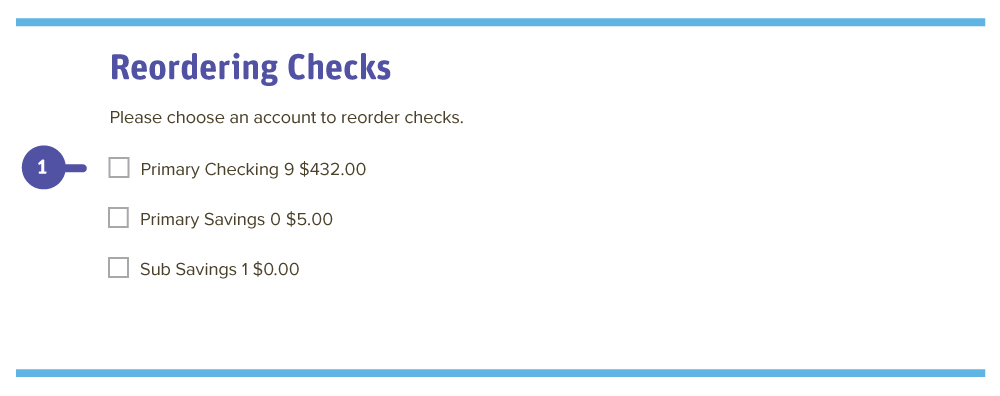
In the Services tab, click on Check Reorder
- Choose the account you want checks ordered for
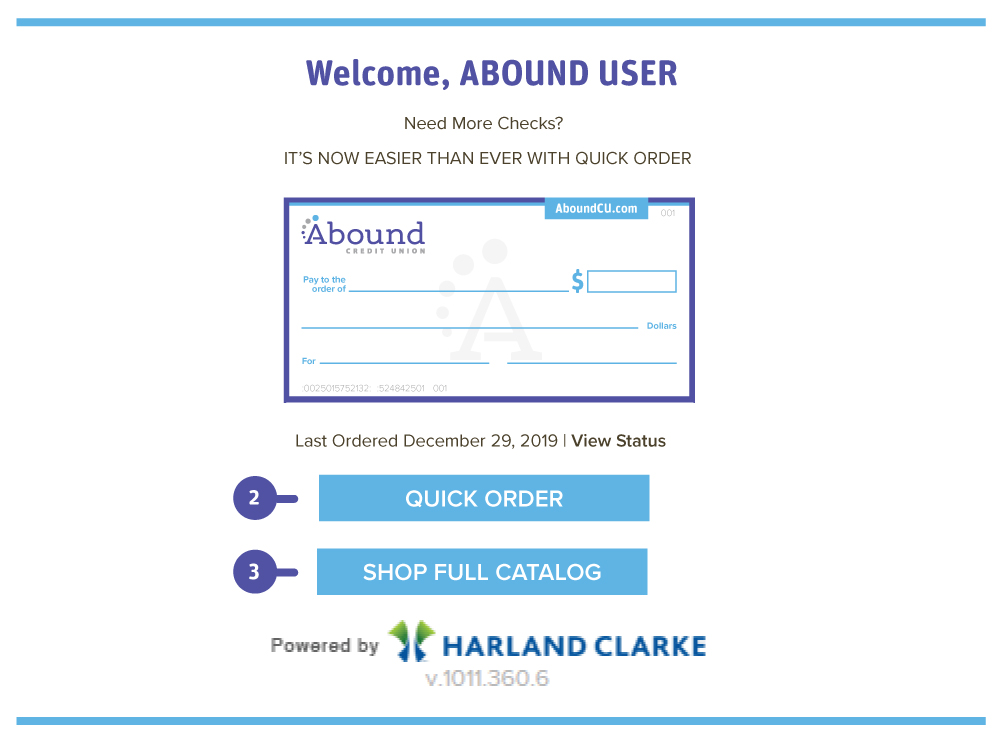
- Complete your order on our vendor's website (Quick Order)
- Complete your order on our vendor's website (View Full Catalog)
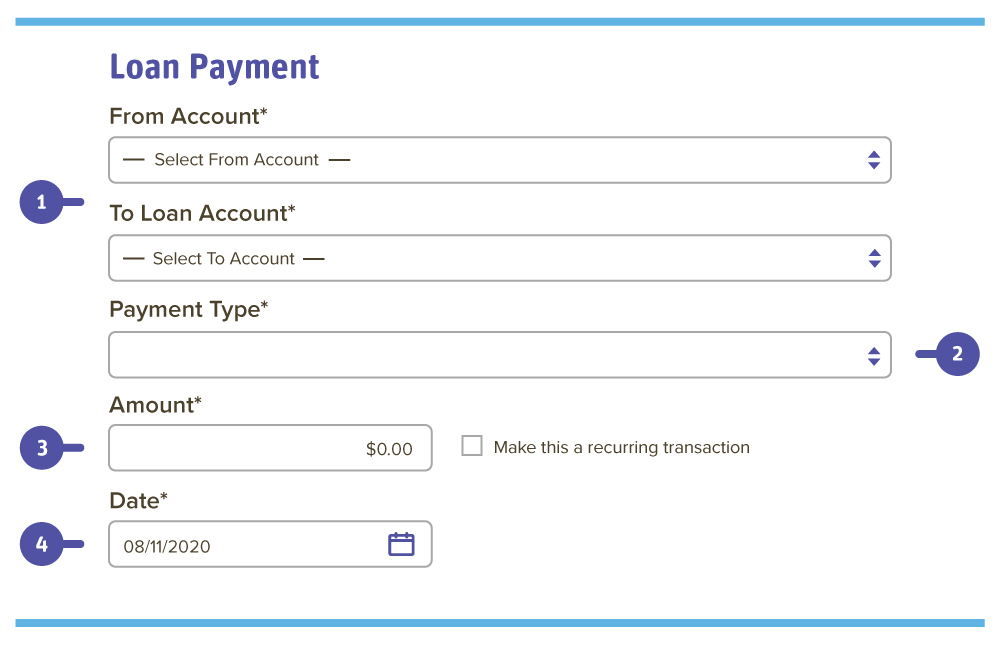
One-Time Payment
In the Transactions tab, click Make Payments
- Using the "From" and "To" dropdowns, select the account the funds will be taken from and the account you wish to post the payment
- Select your payment type using the "Payment Type" drop-down
- Enter the amount of the payment or leave the pre-populated payment amount
- (One-Time Payment Only) Enter the date to process the transaction
Recurring Payment
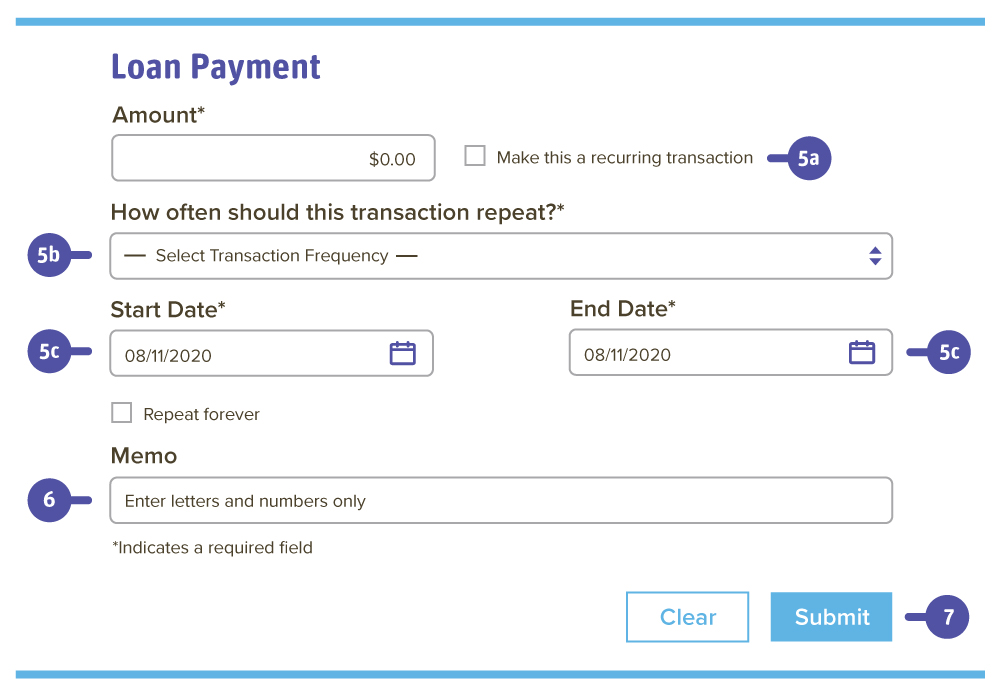
5. If you would like to set up a recurring payment, follow the steps below:
a. Check the box next to "Make this a recurring transaction" to repeat the transfer
b. Use the "How often should this transfer repeat?" drop-down to specify how often the transfer should occur
c. Enter a start and end date for this transaction using the calendar features
d. If your transaction doesn't have an end date, check the box next to "Repeat Forever"
6. (Optional) Enter a memo
7. Click the Submit button when you are finished
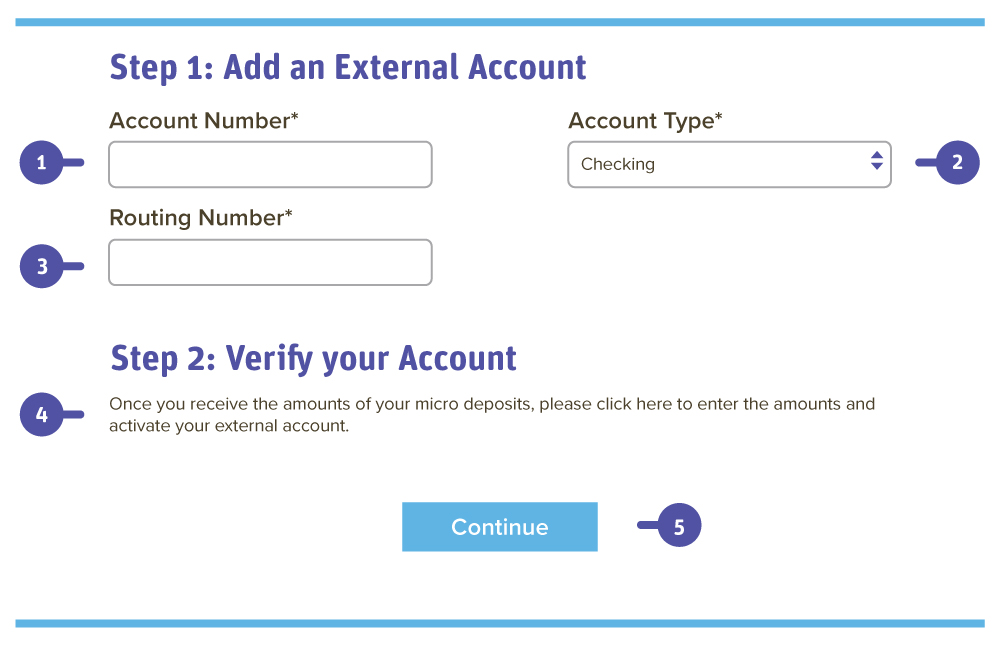
Under the Move Money tab, click Add External Account
- Insert the external account's Account Number
- Choose which Account Type you will be linking to
- Insert the external account's Routing Number
- Verify your account: Two "micro" deposits will be generated and sent to your external account (typically within 5 business days). Micro deposits are random deposits in amounts less than $1. Once you have received these two micro deposits in your external account, make note of both amounts as you will need them later in step 2, the verification process.
- Press Continue
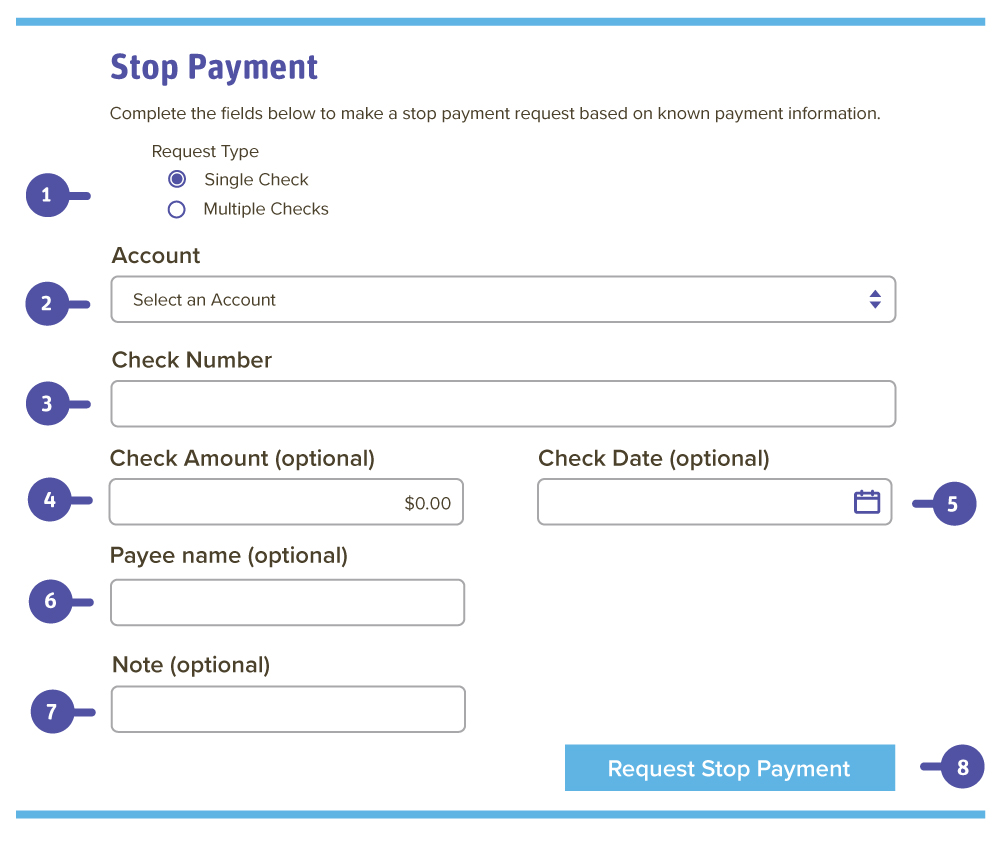
In the Services tab, click Stop Payment
- Choose to stop a single check or multiple checks
- Select an Account in the drop-down
- Insert the Check Number
- (Optional) Insert the Check Amount
- (Optional) Insert the Check Date
- (Optional) Insert the Payee Name
- (Optional) Insert a note
- Click the "Request Stop Payment" button
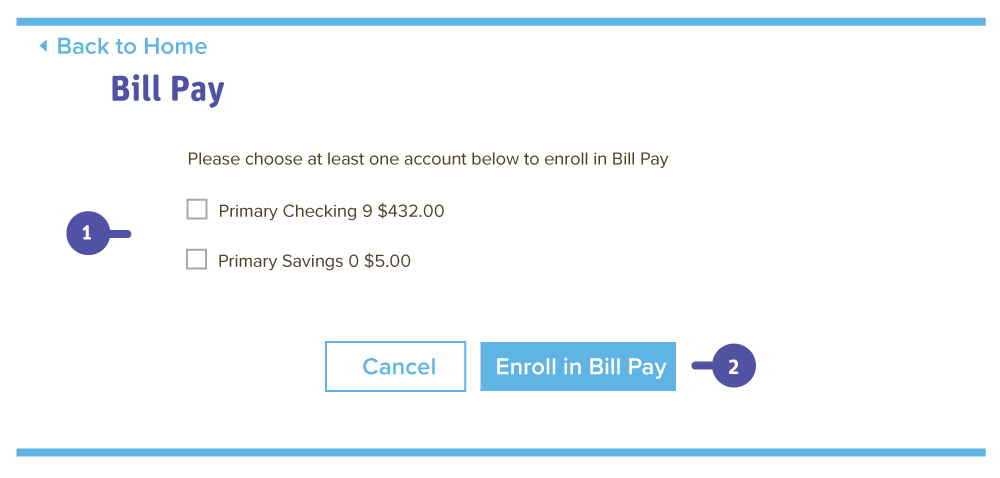
Enroll in Bill Pay
Click the Pay Bills tab
- Choose which account you want to link Bill Pay to
- Click Enroll in Bill Pay
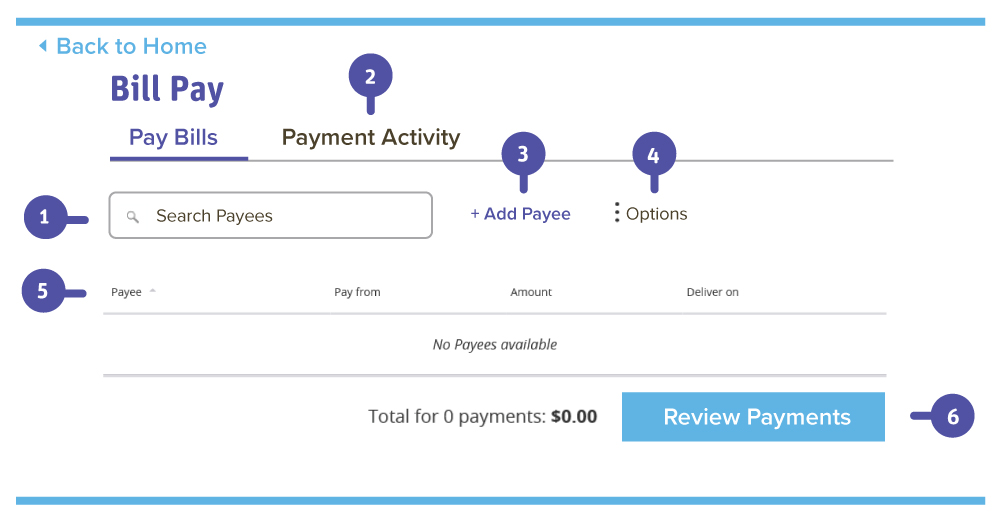
Bill Pay Dashboard
Click the Pay Bills tab
On the Bill Pay Dashboard, youre able to:
- Search Payees
- Review Payment Activity
- Add a Payee
- Under Options, you can delete Payees or go to our Bill Pay site
- Sort Payees
- Review Payments
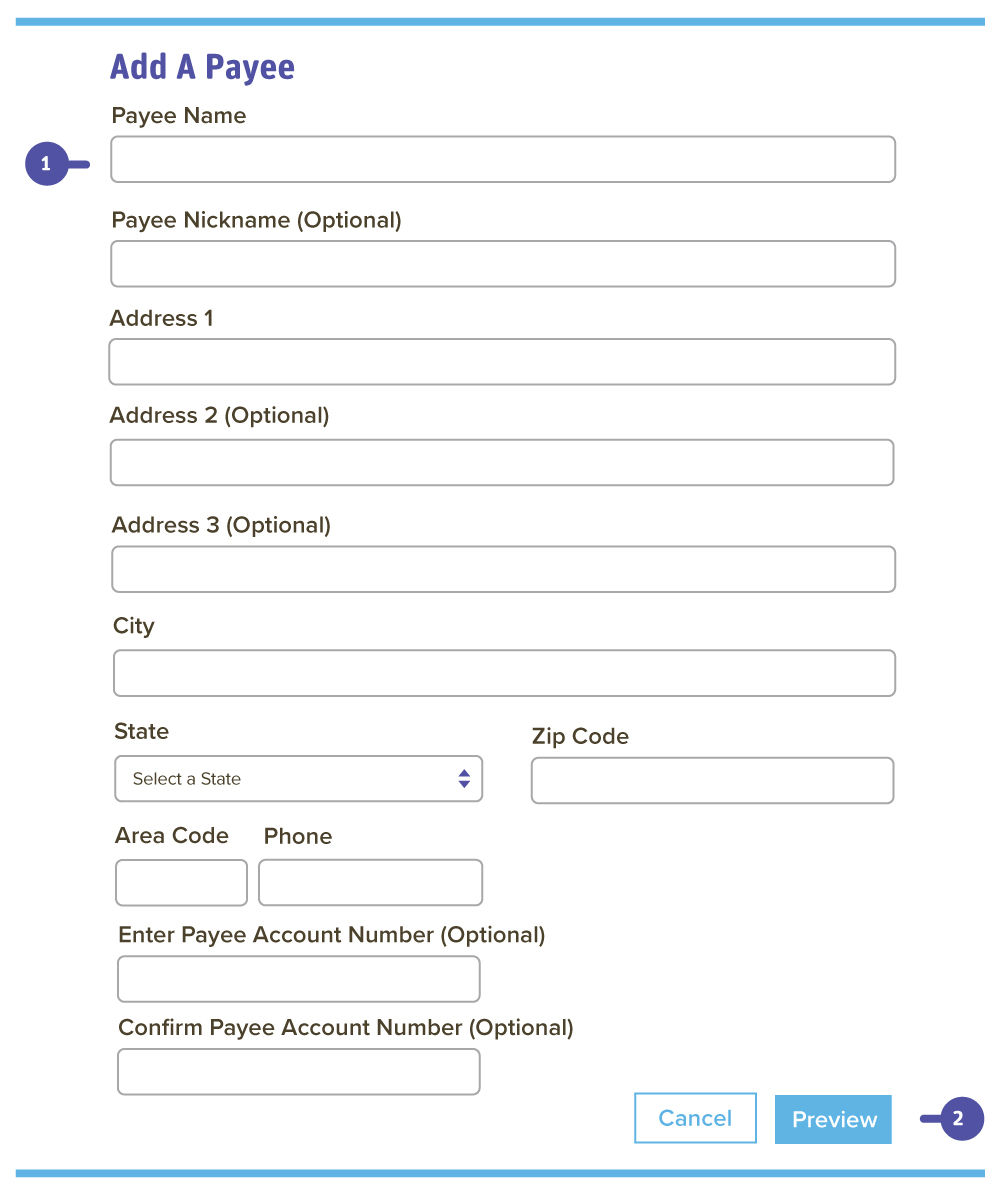
Add A Payee
Click the Pay Bills tab and click "Add a Payee" on the dashboard
- Fill out the payee's required information
- Click Preview
Abound Credit Union is a full-service financial institution with locations throughout central and southern Kentucky.

We help you finance your dream car through a low rate and flexible term loan.

Have Questions?
We help you find answers.
*Carrier rates may apply for data usage.
¹Apple, the Apple logo, iPhone and iPad are trademarks of Apple Inc., registered in the U.S. and other countries. Apple Pay®, Face ID, and Touch ID are trademarks of Apple Inc. Google PayTM is a registered trademark of Google LLC. Samsung Pay® is a registered trademark of Samsung Electronics Co., Ltd. Mobile carrier charges may apply.

